How to Set Up a Minecraft Server
Published: 13 November 2022
Getting Started
Prerequisites
The Minecraft Server executable requires the Java Runtime Environment to be installed on your computer. If you do not have Java installed, or think you may have an outdated version, you can download the latest version here.
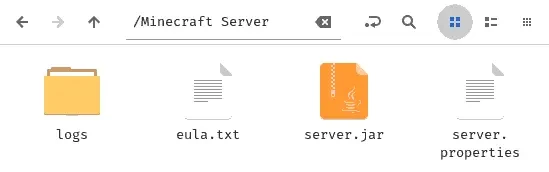
Setting up the server files
Firstly, you will need the server files.
- Go to the Minecraft Server Download page and download the
minecraft_server.<version>.jarfile. - Create a new folder with a memorable name and move the
minecraft_server.<version>.jarfile into your new folder. - Open the
minecraft_server.<version>.jarfile with Java by double-clicking on it.
You should now see some new files appear in your server directory.
Server Configuration
To host a Minecraft Server, you must agree to the End User License Agreement (EULA).
- Inside your server directory, you should be able to see a
eula.txtfile. Double-click on this file to open it. - Read the contents of the file. Most importantly, read the Minecraft EULA.
- Only if you agree to the EULA, change
eula=falsetoeula=true.- (If you don’t want to agree to the EULA, stop here and check out Lunati or Vintage Story instead!)
- Save and close the
eula.txtfile.
Gathering Device Information
You’re going to need to gather unique details about your device and network configuration. This guide will help you find the IPv4 address and MAC Address of your Server Computer, and the Default Gateway address of your router.
Finding the local IPv4 Address of the Server Computer
Each device in your home network has its own local IP (Internet Protocol) address. We need to find the IP address of the device that is hosting the Minecraft server.
Windows Instructions
- Open the command prompt by holding down the
Windowskey and pressingRto bring up the Run dialog. - Type
cmdinto the Run dialog and hitEnter. - In the command prompt, type in
ipconfigand hitEnter. - Look for the line starting with
IPv4 Addressto find your IPv4 address. Make a note of this, as you will need it later.
macOS Instructions
- Open the Terminal application from the Launchpad on macOS.
- In your terminal, type in
ipconfig getifaddr en0and hitEnter. - Your device’s IP address should be printed in the output. Make a note of this, as you will need it later.
Finding the Physical (MAC) Address of the Server Computer
Each device has its own Media Access Control (MAC) address. You’ll need your device’s MAC Address to set a Static DHCP Lease.
Windows Instructions
- Open the command prompt by holding down the
Windowskey and pressingR. - Type
cmdinto the Run dialog and hitEnter. - In the command prompt, type in
ipconfigand hitEnter. - Look for the line starting with
Physical Addressto find your MAC address. Make a note of this.
macOS Instructions
- Open the Terminal application.
- In your terminal, type in
networksetup -listallhardwareportsand hitEnter. - If connected via Wi-Fi, find the MAC Address below the line
Hardware Port: Wi-Fi.- The address after
Ethernet Address:is your MAC Address.
- The address after
- If connected via Ethernet, find the MAC Address below
Hardware Port: Ethernet.
Finding the Default Gateway address
Windows Instructions
- Open the command prompt by holding down the
Windowskey and pressingR. - Type
cmdinto the Run dialog and hitEnter. - In the command prompt, type in
ipconfigand hitEnter. - Look for the line starting with
Default Gatewayto find your Default Gateway address.
macOS Instructions
- Open the Terminal application.
- In your terminal, type in
netstat -nr | grep defaultand hitEnter. - Your default gateway address should be at the top of the output.
Router Configuration
Most household routers have a web interface you can access via the Default Gateway Address.
Accessing the Router Administration panel
- Open a web browser and enter the Default Gateway address.
- If requested, default login credentials are usually
adminfor the username and eitherpasswordoradminfor the password.
Setting a Static DHCP lease for the Server Computer
To ensure the Server Computer’s IP address doesn’t change:
- Find the DHCP menu in the router configuration panel.
- Add a Static Lease for your Server Computer:
- Set the Host Name to a short name for your device (e.g.
home-pc,server-pc, orkyles-laptop). - Set the MAC Address to the Physical Address of the Server Computer.
- Set the IP address to the IPv4 address of the Server Computer.
- Set the Host Name to a short name for your device (e.g.
Port Forwarding
To allow external connections to your Minecraft Server:
- Find the Port Forwarding menu.
- Create a new Port Forwarding rule with these settings:
- Set the configuration name to
Minecraft. - Set the WAN and LAN port to
25565. - Set the protocol to both
UDPandTCP. - Set the destination IP address to the IPv4 address of the Server Computer.
- Set the configuration name to
Remember to save the changes.
Configuring the Server Properties
- Open
server.propertiesin the server directory with a text editor. - Edit settings to suit your needs:
server-ip=should equal your server computer’s IPv4 address.- Set
op-permission-level=3if you don’t want operators to stop the server. - Set
white-list=trueto configure a list of approved players. - Change
pvp=truetopvp=falseif you want to disable player-versus-player combat. - Switch
gamemode=survivaltogamemode=creativefor Creative mode. - Set
difficulty=easyto your preferred difficulty level. - Change
allow-flight=falsetoallow-flight=trueif you don’t want players kicked for false positives.
For more details on the server.properties file, refer to the Minecraft Wiki Page.
Launching the Server
Basic Launch
- Right-click the
server.jarfile. - Select
Open With…and choose Java Runtime Environment.
Launching the server with a script
Windows Instructions
- Right-click in your server folder and create a new text document.
- Rename the
New Text Document.txttoserver.bat. - Edit
server.batto include the following:
@echo off
java -Xms2G -Xmx4G -jar server.jar nogui
PAUSE
Connecting to the Server
Once your server is up and running, players can connect to it using the IP address and port. Here are the steps to connect:
Connecting from the Same Network
- Open Minecraft on the device you want to play on.
- Go to the multiplayer section and select “Direct Connect.”
- Enter the local IPv4 address of your server computer followed by
:25565(e.g.,192.168.1.100:25565). - Click “Join Server” to connect.
Connecting from an External Network
For others to join from outside your network, you’ll need to give them your public IP address.
- Search “What’s my IP” in your web browser to find your public IP.
- Share this IP address followed by
:25565(e.g.,203.0.113.45:25565) with anyone who wants to join.
Note: It’s generally safer to limit sharing your IP address only with people you trust. Setting up a whitelist in the server.properties file can also help control who can join.
Troubleshooting Common Issues
“Server is outdated” Error
If you or your players see an error about the server being outdated, it’s likely due to using a newer version of Minecraft than your server supports. To resolve this:
- Update the server
.jarfile to the latest version from the Minecraft Server Download page. - Make sure that players are using the same Minecraft version as the server.
“Cannot connect to server” or “Timed out” Errors
This issue is often due to misconfigured network settings:
- Double-check that the server’s IPv4 address hasn’t changed if you’re on a dynamic IP.
- Verify that the port forwarding settings on your router are still set correctly.
- Ensure any firewall on the server computer allows traffic on port 25565.
Performance Issues
If players experience lag or slow gameplay:
- Consider increasing the server’s RAM allocation in the
server.batscript by adjusting the-Xmsand-Xmxoptions. - Reduce view distance and player slots in
server.properties. - Ensure that your server computer meets Minecraft’s minimum hardware requirements.
Additional Resources
For more detailed instructions and support, check out:
- The Minecraft Wiki for comprehensive information on configuring servers.
- SpigotMC and PaperMC if you’re interested in optimizing or modifying your server.
- Minecraft Forum for community support and discussion.
By following these steps, you should have a fully operational Minecraft server that you and your friends can connect to and enjoy. Good luck, and have fun building!